Tag: safety standards

  • Choosing the right lighting for rooftop spaces with style

    Choosing the right lighting for rooftop spaces with style

    Choosing the right lighting for rooftop spaces sets the stage for unforgettable evenings under the stars. Rooftop areas offer a unique opportunity to blend indoor comfort with outdoor charm, and the right lighting can transform these spaces into inviting retreats. From ambient to task lighting, exploring the ideal choices can enhance your experience, whether you’re hosting a lively gathering or enjoying a quiet night alone.

    This guide dives into various types of lighting suitable for rooftops, comparing options like LED, solar, and traditional fixtures while highlighting how to design an effective lighting layout. Moreover, it emphasizes the importance of selecting decorative fixtures that enhance ambiance while ensuring safety and weather resistance. Understanding these elements is crucial for creating a rooftop oasis.

    Selecting the Right Type of Lighting

    Selecting the right lighting for rooftop spaces is crucial for creating an inviting atmosphere, ensuring safety, and enhancing the aesthetic appeal of the area. A well-lit rooftop can transform a simple open space into a vibrant outdoor retreat. Understanding the various types of lighting available will help in making informed decisions that cater to both functional and decorative needs.When choosing lighting for rooftop spaces, it is essential to consider the three main types: ambient, task, and accent lighting.

    Each type serves a unique purpose and can be utilized to achieve different effects. Ambient lighting provides general illumination, task lighting highlights specific areas for activities such as dining or reading, and accent lighting adds visual interest by highlighting architectural features or plant life.

    Types of Lighting Options

    When evaluating different lighting options, one must consider various factors like energy efficiency, cost, and lifespan. Below are some common lighting technologies suitable for rooftop spaces, along with their advantages and disadvantages:

    • LED Lighting:

      LEDs are highly energy-efficient, with a lifespan of up to 50,000 hours.

      Advantages include low energy consumption and minimal heat emission. However, initial costs can be higher compared to traditional bulbs.

    • Solar Lighting:

      Solar lights harness energy from the sun, making them eco-friendly.

      They are cost-effective in the long run and require no wiring. On the downside, they may not perform well in cloudy conditions and can have limited brightness.

    • Traditional Lighting (Incandescent/Fluorescent):

      Traditional lights are widely available and inexpensive.

      While they offer warm light, they are less energy-efficient and have shorter lifespans compared to LEDs.

    Comparison of Lighting Types

    To facilitate a clearer understanding of different lighting options, the following table compares LED, solar, and traditional lighting based on critical factors:

    Lighting Type Energy Efficiency Initial Cost Lifespan
    LED High Moderate 50,000 hours
    Solar Moderate (Depends on sunlight) Moderate to High 30,000 hours
    Traditional Low Low 1,000 hours (Incandescent), 10,000 hours (Fluorescent)

    Making the right choice in lighting will not only enhance the usability of rooftop spaces but also contribute to energy savings and the overall aesthetic appeal of the area. Each lighting type has its strengths and weaknesses, and understanding these can lead to a well-lit, harmonious rooftop experience.

    Designing a Lighting Layout

    Choosing the right lighting for rooftop spaces

    Creating an effective lighting layout for rooftop spaces is essential for maximizing the utility and enjoyment of these areas. Properly planned lighting not only enhances the aesthetic appeal but also ensures safety and functionality for various activities. This guide Artikels a step-by-step approach to designing a lighting layout that accommodates different purposes, from dining to relaxation.To create a successful lighting layout, it is important to consider the specific zones for your rooftop space.

    Each zone should be tailored to the activities expected to take place there, with appropriate lighting that enhances the experience while providing safety and comfort. Below is a structured guide for designing your rooftop lighting layout.

    Step-by-Step Guide to Lighting Layout Design, Choosing the right lighting for rooftop spaces

    When designing the lighting layout, follow these key steps to ensure that each area of your rooftop serves its intended purpose effectively.

    1. Evaluate the Space: Begin by assessing the dimensions and layout of your rooftop. Identify areas for specific activities like dining, lounging, or gardening.
    2. Determine Lighting Needs: Consider the type of activities that will take place in each zone and the amount of light required. For instance, dining areas may need brighter lighting compared to relaxing spaces.
    3. Choose Lighting Fixtures: Select appropriate fixtures based on style, functionality, and energy efficiency. Options may include LED string lights, wall sconces, or floor lamps.
    4. Design Layout Zones: Divide the rooftop into distinct zones, each with its specific lighting requirements.
    5. Plan Electrical Sources: Ensure that power outlets are conveniently located for your lighting fixtures and that the wiring is safely installed.
    6. Test & Adjust: Before finalizing your layout, test the lights in different settings to see how they illuminate the space. Adjust fixture placement as needed for optimal light distribution.

    Incorporating Lighting Zones for Different Activities

    Creating lighting zones allows for a tailored atmosphere suited to various activities on the rooftop. Each zone should be distinct, ensuring that the lighting serves its intended purpose effectively. Below is a table detailing suggested lighting placements and their corresponding purposes.

    Further details about Ideas for rooftop party decorations and themes is accessible to provide you additional insights.

    Zone Lighting Type Purpose
    Dining Area Suspended pendant lights or string lights Provide bright, focused light for dining; create an inviting atmosphere.
    Lounging Area Soft, ambient floor lamps or wall sconces Enhance relaxation with warm light; encourage social interaction.
    Gardening Space Spotlights or task lighting Illuminate specific plants and working areas; facilitate gardening during evening hours.
    Entertainment Zone Color-changing LED lights or fairy lights Create a vibrant atmosphere; set mood for movie nights or gatherings.
    Walkways Recessed lights or solar path lights Ensure safety and visibility; guide guests through the space comfortably.

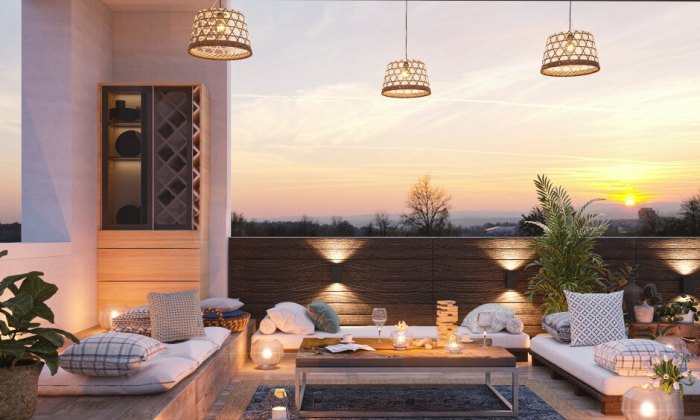
    “A well-designed lighting layout not only enhances the beauty of rooftop spaces but also elevates the overall experience, making it feel like an extension of your home.”

    Enhancing Ambiance with Lighting Fixtures: Choosing The Right Lighting For Rooftop Spaces

    Choosing the right lighting for rooftop spaces

    Creating a captivating ambiance in rooftop spaces involves careful selection and placement of lighting fixtures that not only illuminate but also enhance the overall aesthetic. The right fixtures can transform an ordinary rooftop into a tranquil escape or a vibrant entertaining space. Understanding the interplay between design and function is key to achieving the desired atmosphere.Lighting fixtures serve as both practical tools and decorative elements.

    Selecting decorative lighting that aligns with the rooftop’s theme can elevate the entire space. Consider how various styles of fixtures can complement the architecture and furnishings of your rooftop. Using dimmable lights is another effective method for adjusting the ambiance according to different occasions, allowing you to create a cozy atmosphere for intimate gatherings or bright lighting for lively parties.

    Selection of Decorative Lighting Fixtures

    Choosing decorative lighting fixtures is essential for creating an ambiance that reflects your personal style and complements the rooftop’s design. Here are some tips to guide your selection:

    Assess the overall theme

    Ensure that the lighting fixtures align with the existing design elements of the rooftop.

    Scale and proportion

    Choose fixtures that are appropriately sized for the space. Oversized fixtures can dominate a smaller area, while tiny lights may get lost in a vast space.

    Material and finish

    Opt for materials that withstand outdoor conditions while matching the aesthetic, such as weather-resistant metals or glass.

    Layered lighting

    Combine different types of fixtures, such as wall sconces, pendant lights, and string lights, to create depth and warmth.Furthermore, the use of dimmable lights allows for maximum versatility in how the space is used throughout the day and night.

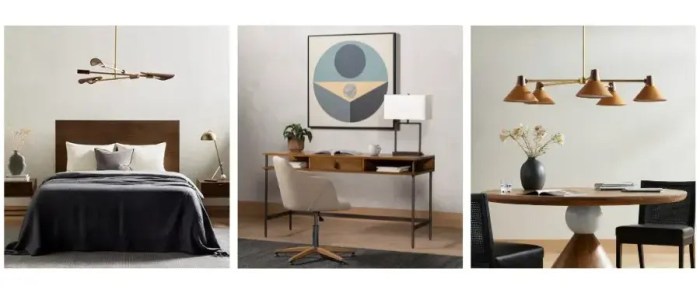
    Popular Lighting Styles

    When considering the aesthetic of your rooftop, selecting the right lighting style can have a profound impact. Below are several popular lighting styles that can enhance the ambiance of your rooftop space:

    Modern

    Clean lines, minimalistic designs, and often featuring materials like metal and glass. Perfect for contemporary rooftops.

    Rustic

    Incorporates natural elements such as wood, wrought iron, and vintage finishes. Ideal for a cozy, farmhouse-style setting.

    Industrial

    Characterized by raw, unfinished materials, exposed bulbs, and utilitarian designs. Works well in urban environments or loft-style rooftops.

    Bohemian

    Features eclectic and colorful designs, such as pendant lights with intricate patterns. Adds a relaxed, artistic vibe.

    Mediterranean

    Often includes lantern-style fixtures and warm finishes, reminiscent of coastal getaways. Great for creating a vacation-like atmosphere.Implementing these styles thoughtfully will ensure your rooftop space not only shines but also resonates with your intended ambiance.

    Safety Considerations for Rooftop Lighting

    Rooftop lighting plays a crucial role in enhancing both the aesthetic and functional aspects of outdoor spaces. However, safety should always be a top priority during installation and maintenance. Understanding the essential safety standards and regulations, as well as implementing secure and weather-resistant designs, can prevent accidents and ensure longevity of the lighting systems.Adhering to safety standards and regulations is fundamental in rooftop lighting installations.

    These standards vary by location, but generally, they encompass electrical safety codes, structural integrity requirements, and specific guidelines for outdoor installations. Compliance with local building codes, such as the National Electrical Code (NEC) in the United States, ensures that lighting systems are safely integrated into the rooftop environment. This not only protects the users but also minimizes liability risks for property owners.

    Essential Safety Standards and Regulations

    Several key regulations guide the safe installation of rooftop lighting systems. Familiarizing yourself with these can significantly enhance safety:

    • Local Building Codes: Ensure compliance with municipal regulations that dictate structural and electrical standards for rooftop installations.
    • National Electrical Code (NEC): Familiarize yourself with NEC guidelines to prevent electrical hazards, including proper grounding and circuit protections.
    • OSHA Regulations: Adhere to Occupational Safety and Health Administration (OSHA) guidelines to ensure worker safety during installation and maintenance processes.

    Secure and Weather-Resistant Lighting Fixtures

    Selecting the right lighting fixtures is vital for the safety and durability of rooftop lighting systems. Fixtures must be designed to withstand various weather conditions, such as rain, snow, and extreme temperatures. Utilizing fixtures that have a suitable IP rating (Ingress Protection) helps in determining their resistance to dust and water.Also, consider materials that are rust-resistant, such as aluminum or stainless steel, which can prolong the life of your lighting fixtures and prevent accidents caused by corrosion.

    Checklist of Safety Features

    When choosing and installing rooftop lighting, the following checklist of safety features will help ensure a secure and efficient setup. This will serve as a reliable guide during the selection and installation process:

    • ✔ Waterproof ratings: Look for fixtures with a minimum IP65 rating to ensure they can resist water intrusion.
    • ✔ Secure mounting: Use robust mounting hardware and brackets designed for rooftop applications to prevent fixtures from becoming dislodged.
    • ✔ UV protection: Opt for fixtures with UV-resistant materials to prevent degradation from sun exposure.
    • ✔ Anti-glare features: Choose fixtures designed to minimize glare, improving visibility and safety for users.
    • ✔ Circuit protection: Implement surge protectors and circuit breakers to guard against electrical surges.
  • Best materials for rooftop construction and safety

    Best materials for rooftop construction and safety

    Best materials for rooftop construction and safety are crucial considerations for anyone looking to build or renovate. The right choice not only influences the longevity of the structure but also impacts safety and environmental sustainability. In this exploration, we will delve into the top materials available, their distinct properties, and the safety standards that govern rooftop construction.

    From traditional asphalt to innovative green roofing solutions, understanding the benefits and drawbacks of each material can guide effective decision-making. Furthermore, we will examine essential safety regulations and practices that ensure worker protection during installation and maintenance, making this a comprehensive guide for building a safe and durable rooftop.

    Best Roofing Materials

    Best materials for rooftop construction and safety

    When it comes to rooftop construction, the choice of materials is crucial for ensuring durability, safety, and aesthetic appeal. The right roofing material not only contributes to the overall look of a building but also impacts energy efficiency, maintenance requirements, and longevity. This discussion focuses on the top five roofing materials widely recognized for their performance and benefits in construction.

    Top Roofing Materials

    Understanding the characteristics and advantages of various roofing materials is essential for making informed decisions. The following five materials are among the best options available, each offering unique properties that cater to different needs and preferences.

    • Asphalt Shingles: Widely popular in residential construction, asphalt shingles are known for their affordability and versatility. They come in a variety of colors and styles, which allows homeowners to customize their roofs easily. With a lifespan of 15-30 years, asphalt shingles are relatively durable and provide good protection against various weather conditions. However, they have less environmental impact compared to other materials and may require replacement after a couple of decades.

    • Metal Roofing: Metal roofs are recognized for their exceptional durability and longevity, often lasting 40-70 years. Materials such as steel and aluminum are resistant to extreme weather, fire, and pests. Metal roofs can reflect solar radiant heat, improving energy efficiency in homes. Although the initial cost may be higher than asphalt shingles, their lifespan and low maintenance needs often result in long-term savings.

      Additionally, many metal roofing options are made from recycled materials, making them more environmentally friendly.

    • Clay and Concrete Tiles: Both clay and concrete tiles are favored for their aesthetic appeal and durability. They can withstand harsh weather, including high winds and heavy rain, with lifespans reaching 50 years or more. Their natural insulating properties enhance energy efficiency, reducing heating and cooling costs. However, the weight of these tiles requires a sturdy roof structure, and the upfront cost can be significant.

      Their environmental impact is minimal, especially when sourced sustainably.

    • Slate Roofing: Renowned for its elegance and longevity, slate is one of the most durable roofing materials available, often lasting over a century. Its natural stone composition offers excellent resistance to severe weather, fire, and insects. While slate roofs are more expensive to install, their longevity and low maintenance requirements make them a worthwhile investment. Additionally, slate’s sustainable sourcing contributes to its low environmental impact.

    • EPDM (Ethylene Propylene Diene Monomer): Commonly used in commercial roofing, EPDM is a synthetic rubber that provides excellent weather resistance. Its durability allows it to last 25-30 years, and it requires minimal maintenance. EPDM is also energy efficient, as it can be coated with reflective materials to reduce heat absorption. The cost-effectiveness and ease of installation make EPDM a popular choice for flat roofs.

      However, its environmental impact can vary depending on the manufacturing process and disposal methods.

    The choice of roofing material significantly affects the durability, cost, and environmental footprint of a building. By evaluating the properties and benefits of these top five materials, homeowners and builders can make informed decisions to match their specific needs and preferences.

    Safety Standards in Rooftop Construction: Best Materials For Rooftop Construction And Safety

    Rooftop construction presents numerous challenges and risks, making adherence to safety standards essential for protecting the workforce and ensuring the structural integrity of the building. Safety regulations not only facilitate a secure working environment but also enhance overall project efficiency. This segment delves into the vital safety standards governing rooftop construction, the significance of equipment, and a systematic checklist to ensure safe practices on the job site.

    Essential Safety Regulations

    The construction industry is heavily regulated, and rooftop work is no exception. It is critical to comply with established safety regulations set forth by organizations such as the Occupational Safety and Health Administration (OSHA) in the United States, which Artikels guidelines for fall protection and hazard communication. Key regulations include:

    Fall Protection

    Workers must be protected from falls of six feet or more in the construction industry. This can be achieved using guardrails, safety nets, or personal fall arrest systems.

    Hazard Communication

    Employers are required to provide information about hazardous materials workers may encounter, which should include Safety Data Sheets (SDS) and proper labeling of chemicals.

    Scaffolding Standards

    When scaffolding is used on rooftops, it must meet specific criteria to ensure stability and safety, including proper assembly and load capacity checks.

    Importance of Safety Gear and Equipment, Best materials for rooftop construction and safety

    Proper safety gear and equipment are indispensable in safeguarding workers during rooftop construction. Essential safety equipment includes:

    Hard Hats

    Protect against head injuries from falling objects.

    Safety Harnesses

    Crucial when working at heights, ensuring that a fall does not result in severe injury.

    Non-slip Footwear

    Essential for maintaining traction on potentially slippery surfaces.

    Protective Eyewear

    Shields against debris and harmful rays from the sun.The use of this equipment not only complies with safety regulations but also fosters a culture of safety within the workforce, reducing the likelihood of accidents and injuries.

    Safety Practices Checklist

    Implementing a comprehensive safety practices checklist is vital for any rooftop construction project. The following points highlight key practices to ensure worker safety:Before commencing work, it is essential to conduct thorough preparations and checks:

    • Conduct a risk assessment to identify potential hazards.
    • Ensure all workers have received proper training for rooftop safety.
    • Check weather conditions; avoid working in adverse weather such as storms or high winds.
    • Verify that all safety equipment is in good working condition and readily available.

    During the work process, continuous vigilance and adherence to safety practices are necessary:

    • Utilize guardrails and safety nets where required.
    • Wear appropriate personal protective equipment (PPE) at all times.
    • Maintain clear communication among workers, especially when working in pairs or teams.
    • Keep the work area organized to prevent trips and falls.

    After the completion of work, the following steps should be taken to ensure ongoing safety:

    • Inspect the work area to ensure it is free of hazards before leaving.
    • Conduct a debriefing with workers to discuss any safety issues encountered during the job.
    • Document any incidents or near misses to improve future safety protocols.

    Following these safety standards and practices is not just a legal obligation; it is a moral responsibility to protect the lives of those working on rooftops.

    Installation Techniques for Roofing Materials

    Best materials for rooftop construction and safety

    The installation of roofing materials is a critical phase in any construction project. Proper techniques not only ensure the longevity of the roof but also contribute to the safety and energy efficiency of the entire building. Understanding the unique requirements for different roofing materials can prevent costly mistakes and ensure a secure, durable installation.

    Asphalt Shingle Installation

    Asphalt shingles are one of the most commonly used roofing materials due to their affordability and ease of installation. The following steps Artikel the installation process:

    1. Preparation

    Start by removing the old roofing material and inspecting the decking for damage. Replace any damaged sections before proceeding.

    2. Underlayment Installation

    Install a water-resistant underlayment to protect against moisture infiltration. Begin at the eaves and overlap each row.

    3. Starter Strip

    Install a starter strip along the eaves, which prevents water from seeping under the shingles.

    4. Shingle Placement

    Begin installing shingles from the bottom of the roof and work upward, staggering the seams for better water resistance.

    5. Nailing

    Use the correct number of nails per shingle as recommended by the manufacturer to avoid blow-offs during storms.

    6. Ridge Cap Installation

    Finally, install ridge cap shingles to cover the peak of the roof, enhancing the aesthetic and providing additional protection.Common mistakes to avoid during asphalt shingle installation include not following the manufacturer’s specifications for nail placement, neglecting to install the underlayment properly, and failing to stagger the shingles correctly.

    Metal Roofing Installation

    Metal roofs offer durability and energy efficiency. The installation process involves specific techniques to ensure a proper fit:

    1. Deck Preparation

    Ensure the roof deck is clean, dry, and free from debris. Repair or replace any damaged areas.

    2. Underlayment

    Install a moisture barrier, ensuring it runs perpendicular to the metal panels for optimal drainage.

    3. Panel Layout

    Plan the layout of the metal panels before installation to minimize waste. Start from one side and work toward the other.

    4. Fastening

    Use the appropriate fasteners and ensure they are driven straight to avoid leaks.

    5. Ridge and Edge Details

    Install ridge caps and edge trims to seal and protect the roof’s vulnerable areas.It is crucial to avoid common pitfalls such as mixing different metals, which can cause corrosion, and failing to account for thermal expansion, leading to warping.

    Tile Roofing Installation

    Tile roofs, known for their aesthetic appeal and longevity, require careful installation:

    1. Roof Inspection

    Inspect the roof structure for strength, as tile is heavier than other roofing materials.

    2. Underlayment Installation

    Apply a waterproof underlayment, ensuring it covers the entire roof surface.

    3. Tile Laying

    Start at the bottom and work upwards, securing each tile with nails or clips according to the manufacturer’s guidelines.

    4. Valley and Ridge Installation

    Pay special attention to valleys and ridges, ensuring tiles are interlocked correctly to prevent water stagnation.To avoid mistakes, ensure tiles are properly aligned, and check for cracks or damage before installation.

    Professional Installation Versus DIY Methods

    While DIY installation can save costs, professional installation often guarantees quality and compliance with safety regulations. Professionals bring expertise, ensuring that all materials are installed according to local building codes and best practices. The following points highlight the importance of professional installation:

    Experience

    Professionals have the skills to handle unexpected challenges, such as structural issues or unfavorable weather conditions, that may arise during installation.

    Safety Standards

    Professionals adhere to safety regulations, minimizing risks associated with working at heights.

    Warranty

    Many manufacturers require professional installation to validate warranties, providing peace of mind.In contrast, DIY methods can lead to errors that may compromise the roof’s integrity and result in higher long-term costs due to repairs or replacements. Therefore, weighing the pros and cons of each approach is essential for a successful roofing project.

    Maintenance and Longevity of Rooftops

    Best materials for rooftop construction and safety

    Roof maintenance is crucial in ensuring the longevity of any building, and the rooftop is no exception. Different roofing materials come with unique maintenance requirements, and understanding these can significantly extend the lifespan of a roof. Regular inspections and timely maintenance can help identify issues before they escalate, ensuring that the roof remains a sturdy shield against the elements.Routine maintenance ensures that roofs perform at their best, minimizing the risk of leaks, structural damage, and other issues that can arise over time.

    Various roofing materials, such as asphalt shingles, metal, and tiles, each have specific needs that must be addressed to maximize their lifespan.

    Maintenance Requirements for Different Roofing Materials

    Each roofing material has its own set of maintenance needs. The following Artikels the primary maintenance requirements for common types of roofing materials:

    • Asphalt Shingles: Regular inspections should include checking for curling, cracking, and missing shingles. Cleaning gutters and downspouts is essential to prevent water backup, which can lead to further damage.
    • Metal Roofing: Metal roofs require periodic checks for rust and loose fasteners. It’s important to clean the roof surface to prevent debris accumulation, which can trap moisture and lead to corrosion.
    • Tile Roofing: Tile roofs should be inspected for broken or dislodged tiles. Moss and algae growth should be treated immediately to prevent further damage. Ensure that valleys and flashing areas are kept clear of debris.
    • Flat Roofing: Inspect for cracks and blisters regularly. It’s vital to check drainage systems to ensure water does not pool, which can compromise the roofing material.

    Routine Inspection and Maintenance Schedule

    Establishing a consistent maintenance schedule is essential for prolonging the life of a roof. A practical routine might look as follows:

    • Monthly: Inspect for any visible damage, clean gutters, and remove debris from the roof surface.
    • Seasonally: Conduct a thorough inspection of roofing materials and flashing, looking for wear and tear, particularly after severe weather conditions.
    • Annually: Schedule a professional inspection to assess the overall condition of the roof, checking for underlying issues that may not be visible during routine inspections.

    Common Issues and Their Solutions

    Different roofing materials can face specific issues, and knowing how to address them effectively can save time and money. Below are common problems associated with various roofing types and suggested solutions:

    • Asphalt Shingle Damage: Curling or buckling shingles indicate age or improper installation. Replacement of damaged shingles and ensuring proper ventilation can prevent further issues.
    • Rust on Metal Roofs: Rust can compromise metal roofs. Treat rust spots immediately with a rust-inhibiting primer and paint to restore protection.
    • Leaking Tile Roofs: Cracked or broken tiles can cause leaks. Replace damaged tiles promptly and ensure that flashing is intact to direct water away from vulnerable areas.
    • Ponding Water on Flat Roofs: If water accumulates, it can lead to leaks and structural damage. Installing tapered insulation can help ensure proper drainage.